Configuring DNS Settings in Protection Power
To get the Content Delivery Network and Web Application Firewall enabled in Protection Power, DNS settings need to be configured. To do so, please follow these steps:
1. Log in to your HostPapa Dashboard.
2. Click on My Services.
3. Under Website Protection, locate Protection Power. Click the service link or click on the Details button to expand.

4. Click the Launch button. A new window will open and you will be logged in to your Protection Power account.
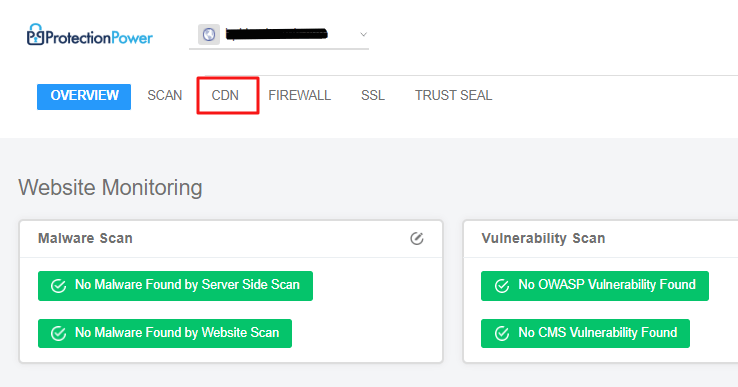
5. Go to the navigation bar on your left-hand side and click on your domain name to open the menu.
6. Click on CDN.
7. Beside the Metrics heading, click Settings.
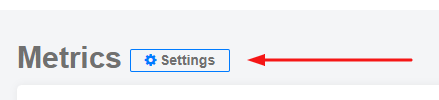
8. Click the Activation tab. The information required for the new A Record will be displayed. Please keep this information handy as you will need it a few steps later.
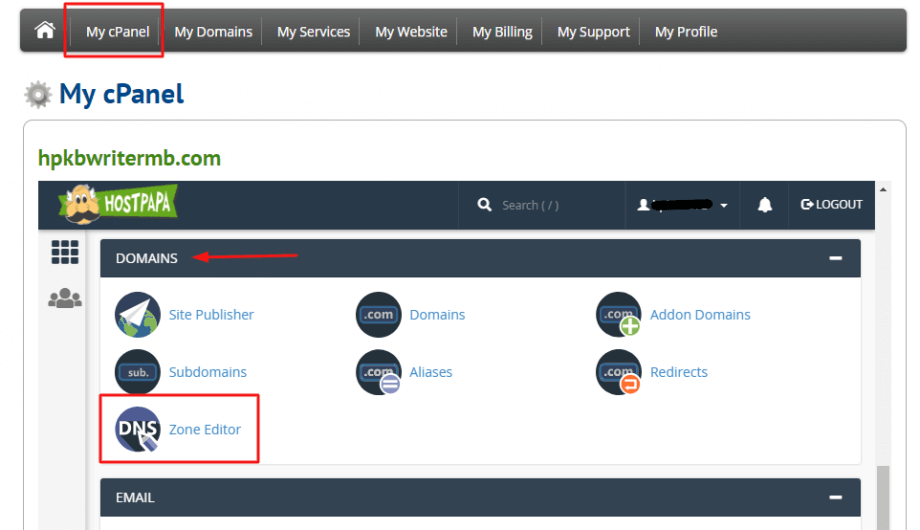
9. Go to your HostPapa Dashboard>>My cPanel and look for the Domains section. If your website is hosted with another provider, log in to your dashboard and follow the same instructions.
Click on the DNS Zone Editor to add the DNS settings information there.
10. In the DNS Zone Editor, locate the domain you want to configure and click the Manage button.

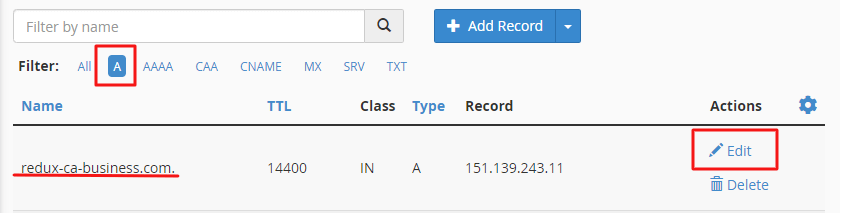
11. To add a new A Record, click A beside Filter to show only the A Records.
12. Click on the Edit button from your domain name record, it is the one at the very top of the list that only includes your domain name. Now you can edit the fields.
Note: Before clicking Edit, check if the numbers under the Record column match the A Record numbers in the Protection Power dashboard (see the next step for how to find them). If the numbers match, you don’t need to edit your A Record. It is already set up correctly.
13. In the field under the Record column, enter the information from the Protection Power dashboard that appears beneath the Value column header in the A Record row. It will look like this:
123.456.78.910
Note: The above information is just an example. The actual information is unique for each domain name.
14. Click the Save Record button. Your A Record is saved.

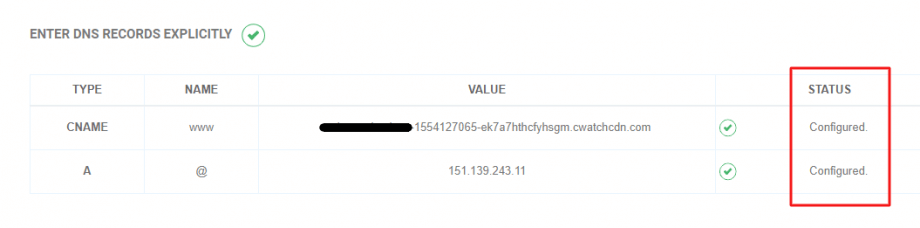
It may take up to 15 minutes for the new changes to go into effect. When Protection Power detects these changes, in the Protection Power dashboard under the CDN Settings Activation tab, the status of both records will change to “Configured.”
Note: You will get a SSL certificate –Edge SSL– for your website included by default, this will activate automatically.
Once your DNS settings are configured, you will be able to route your website traffic through the CDN automatically, with the Firewall providing additional protection against attacks. Usually, it takes up to 10 minutes for the settings to take effect, however, in some cases, it may take a few hours.
The CDN stores copies of your website around the world, thus loading faster for visitors from various locations. This way, you get a boost in both speed and safety, providing the best user experience for your website visitors.
For further questions, or if you need help, please open a support ticket from your HostPapa Dashboard. Click here to learn how to do it.
